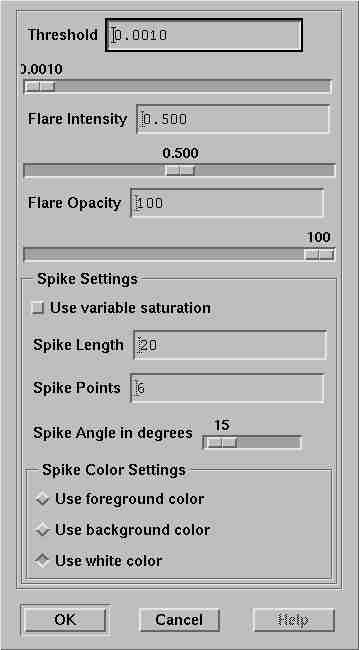
There are number of features that can be set by the user in the Sparkle Dialog box.
Changes to the options effect the current image. These can be removed by using the Undo feature of the GIMP. Changes to the various options do not have an immediate effect on the image. In order for the changes to take effect the OK button must be pressed. Pressing the Cancel button will close the dialog window without making any changes.
The Sparkle plug-in computes the luminosity (level of whiteness) of each pixel in the image (the user can see this when the progress window labeled Generating luminosity array... is displayed). The pixels are put into "buckets", one bucket for each luninosity level. Each bucket can have more than one pixel (since more than one pixel in an image can have the same luminous value). Sparkle then finds the luminosity level at which the threshold percent of the pixels in the selected image area (or the whole image) have that luminosity or higher. These pixels are the center points on which Sparkle will perform its sparkling.
The threshold value is currently a slider/text field pair which have a precision of .0001. However the slider doesn't quite allow a 1/1000th increment with the default dialog window size. The user can use the slider to select the threshold value or type in the value in the text input field. If the granularity of the slider doesn't allow the user to select a specific value, the dialog box can resized wider. This will give the slider better resolution.
Generally, you'll want a fairly small value for the threshold if you're just trying to simulate a lens flare. Even with the examples, which attempt not only lens flare but also flared edges on the sides of the image, the threshold never exceeded 12% of the pixels. Smaller values make for smaller, thinner flares.
This value is used to determine the intensity of the flare around the spike. Smaller values create lighter (less intense) spokes.
Like the Threshold value, the Flare Intensity has both a slider and a text input field for specifying its value. These function the same as the slider/text field pair of the Threshold.
The opacity of the flare determines how much of the flare color will be combined with how much of the original image. For example, if the Flare Opacity is set to 75, then 75% of the flare color will be combined with 25% of the original color. If the original image is fairly evenly colored then the flare will look like a normal flare only darker or lighter. If the original image has a fairly wide range of colors in the area around the flares center then the effects are unpredictable (at least to my mathematically limited mind). Some tests I ran while adding this code produced effects that looked somewhat like paint splashes.
Like the Threshold value, the Flare Intensity has both a slider and a text input field for specifying its value. These function the same as the slider/text field pair of the Threshold.
This button may or may not have much effect on an image. By default a value of 1.0 is used for the saturation value when converting from a HSL (Hue, Saturation, Lumimosity) to RGB values for a pixel in a flare. However, pressing this button will provide a new value to be computed for the saturation of each pixel.
In practice I couldn't see much difference between the two, but the code was there from John's original code, so I thought I'd add the ability to choose one or the other.
This is simply the maximum length of the spikes in pixels. Larger values mean longer spikes radiating from a pixel. The length is computed to be exact in the X and Y directions, but obviously the number of pixels at 45 degree angles from these axis' won't be exactly the length value.
This value determines the number of spikes to radiate from a pixel. The default value of 6 was used for the example images and appears to be a fairly reasonable value. Larger values might produce some interesting effects, including feathering around a set of points.
This is the angle between each spike. If you make more spikes than can fit in 360 degrees using this value as the angle between successive spikes, then the spikes may overlap. This could be good or bad. Good if you're creative, bad (possibly) if you're easily frustrated.
The default angle of 15 degrees was used with the example images. Larger values might have more visible effects with longer spikes.
This slider, unlike the others in the Sparkle dialog box, does provide enough granularity to encompass all 360 degrees.
These three buttons, Use foreground Color, Use background Color, Use white Color, are mutually exclusive. By default the spikes will be based on a white coloring for the most luminous parts of the sparkle. By selecting the foreground or background buttons the base color for the spikes can be changed. Be sure to set the foreground or background color for your image to the color you're interested in using the color palette before using this feature.