Lighting Effects


This is a tip that is only for users of Photoshop3 or Photoshop4. The filter "Lighting Effects" is a freebie that came with this program, and in my opinion is practically worth the whole purchase price all by itself. You can find it under the "Render" subheading. What it is is a primitive ray-tracing algorithm. You can select different light sources, and combine them with texture channels to warp your image. Before you can unleash the power of this filter, you'll need to save some texture channels to play with. Just select the image you want to make 3d and save it as a new channel. Depending on how you use it, pure white is the highest point on the image, and black the lowest. Here's a sample of the window you'll see when you fire it up.

Lighting Effects Control Panel

OK, let's look at the window. On the left you're seeing a low-res thumbnail of what your modifications are doing. You'll also notice the points at the outside of the ellipse, as well as the white point in the center. You can click on these and move them around to alter your light source. Widen it, and your image will get brighter. Grab the white spot in the middle and you can move the whole light around. Click on the white square at the upper right, and you'll get a menu to alter the color of the light source, and that little dot will change to match. If it's taking too long to wait between modifications, turn off the "Preview" button and make your modifications first.
At the top under "Style", you'll find a handful of preset effects to use. You can also save your own settings when you find one you like. This on is "*bkg.bump#4", a custom setting of my own.
Next is "Light Type", in this case a spotlight. You can adjust the brightness and spread here, or choose other types of lighting. There are dozens to choose from, but you'll probably want to choose one and use it exclusively throughout a site, so that everything will have a cohesive look. Make sure you decide where your light source is coming from, I generally choose top/left.
After this is "Properties". The first 2 options affect the material itself, NOT the lighting. Shiny+Plastic will give you an effect like shiny metal (no, it's not logical, but that's how it is). These are the 2 options you'll probably spend the most time tweaking.
The next 2 refer to photographic aspects of how the image is processed. Use these if your image is turning out too dark or light. You can "over" or "under" expose the film (sic) or raise and lower the ambient lighting.
The last section is the most fun. "Texture Channel" allows us to specify an image that will warp the surface of the image. Combined with our lighting effects, we're going to get some interesting 3D effects! The default setting is "none". You can specify one of the RGB channels, or a saved channel of your own. If you choose a value for your "Height" that's *too* high, you'll get some rather strange artifacts creeping into your edges. Generally you'll never go over 50 units. Here's some examples, which I'll describe as I go along...


Sample ImageB&W Mask

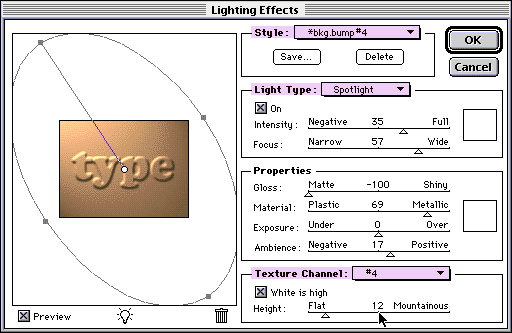
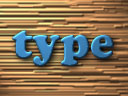
Here's the most basic use of this filter. I typed in some blue type on it's own layer, and saved it to channel #4. Then I fired up the LightFX filter, and chose #4 as my texture filter, white as high, with a Height of 12. The whole thing floats over the brown BKG, and in this case I added some drop-shadow effects for emphasis.


Sample ImageB&W Mask

Here's one of the ways to create those 3D buttons you've all been asking about! Channel #4 is on the left, and the finished piece on the right. This started out as nothing but a blank sheet of brown. Here I specified a height of 50. If you look at the channel closely, you'll see that it's nothing but a straight gradient from black to white, 10 pixels wide.


Sample ImageB&W Mask

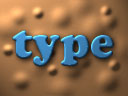
Here all I did was take a blank, black channel, and spray it with my airbrush tool a little bit. I chose white as high, and an offset of 20 units. I could just as easily made them deppressions by not choosing white as "high".


Sample ImageB&W Mask

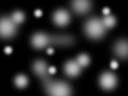
Ever wonder how to get a stone effect? Here's one way. Make your channel a medium grey, and run the "Cloud" filter or the "Difference Clouds" filter on it. Once you've got a nice mottled look to the channel, run the LightFX filter on the main image. I chose an offset of 50 units here, to compensate for the subtlety of the channel.


Sample ImageB&W Mask

Again I used a grey channel, ran the "noise" filter to speckle it up a bit, and then ran the "Wind" filter on it, using the stagger setting. I then blurred it a little bit to soften the edges. Again I used an offset of 50 units.


Well, that's all I have on this one for now. I just want to say again that *this* is the single, most powerful filter you'll deal with in this program. Learn it. Play with it. Don't let it be. You won't regret the time spent, believe me. Gotta run now, talk to you later! Ciao!
Your pal, -doc-


Entire contents copyright ©1994-98 by Doctor Thaddeus Ozone, all rights reserved.