Tiled backgrounds for Netscape and Internet Explorer are on everybody's minds. Here's a techniques that I use frequently. Here's a nice picture of a rock wall that I want to turn into a tiled background. As it stands right now, it won't tile at all. Here, check it out. Looks pretty bad, huh?
Before you even get started on this project, you should make a duplicate of the original file. You'll want to have the original *and* the copy open at the same time. First we're going to offset the duplicate image using the "offset" filter. It's down there under "other". Make sure to select the 'wrap around' option. This image is 240 pixels wide by 160 pixels tall, so we'll push it exactly half that distance. Below is the command window you'll see when firing up the filter.
What was that? You're not using Photoshop, and you don't *have* an 'offset' filter? Bummer. All is not lost, though, you'll just have to do things the hard way. C'mon back when you've got that part done, you'll get the same results, it'll just take a little more time.


Here you see the results of the offset filter. The image now has an ugly seam criss-crossing in the middle, but the edges will match perfectly. (Think about it. The edges are what *used* to be the middle of the image. They can't help but match!)
Now we've got an image where the edges will seam perfectly, all we have to do is get rid of those ugly seams in the middle! There's two methods to get rid of this seam. The first invloves using the "rubber stamp" tool from your cammand pallette. Choose a diffuse brush of about 30-45 pixels, and 'command-click' on the spot you want to copy *from*, preferably in the middle of one of the four quadrants. Now simply click with your brush over where the seams are, and copy away! This is a technique that you'll end up using a lot in the future, so practice with it. You may want to try setting your opacity lower, say to 50% or even 10%. Remeber if it looks bad when you stop, you can always 'command-Z' to undo what you just did!


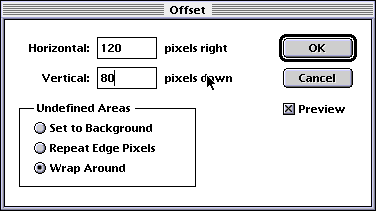
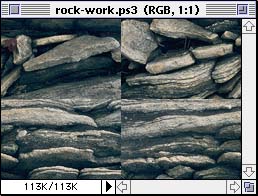
There's another method that I prefer, and that's where the duplicated image comes in. With your two images open side by side, select the original, unaltered image. Now with your 'lasso' tool, select a portion of the image. Now go to the 'select' menu, and choose 'feather' with a setting of 4-8 pixels. This causes your selction to be blurred around the edges.
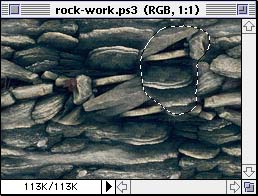
Now copy this selection, click on your working file, and paste it into place. You can drag it around to cover the seams, rotate it if you'd like to get a better fit, the choice is yours! I'll frequently go back and forth several times, choosing different hunks of the original image, and pasting them in different spots. Use the arrow keys to tweak your selections into just the right spot, and you can get some amazing results. Once you have the seams mostly hidden, you can offset the image a smaller amount to make sure you didn't screw up your edges again. Once you've got the image entirely seamless, offsetting won't affect the finished result very much. Here's the result from my work with this image.


Now, when I was done, I had an image that tiled OK, but it was over 11k, which I didn't like very much. A lot of the image was redundant, and the file size was just too large. What I did is select an even smaller portion of the tiled image, and ran through the whole process all over again. The result was a 5k JPEG, saved at the 'medium' quality setting.
All right, maybe it's not one of my better efforts, but it displays the technique pretty well. Almost any overall texture image can be transformed into a tiled background using this technique. That's about it, except for the practice part of this deal, and that's *your* job. You can check out some of my other tiled backgrounds over at my personal site if you'd like. I'm outta here for now, drop me a note if this wasn't very clear. Later!

Your pal, -doc-


Entire contents copyright ©1994-98 by Doctor Thaddeus Ozone, all rights reserved.