| Dealing with High Contrast Backgrounds |
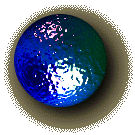
 There are several ways to handle a shadow on a high contrast background. Some of them are demonstrated above, and I'll address the "how-to" aspects one by one. Here goes... There are several ways to handle a shadow on a high contrast background. Some of them are demonstrated above, and I'll address the "how-to" aspects one by one. Here goes... |
|
|
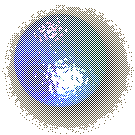
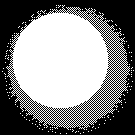
Method one. Ignore the background altogether. Save your image as transparent based on the average color of your background tile. Here's what you do. Open the background, and give it a gaussian blur of *32 pixels*. It will appear to be all one color now, but it's still finely dithered. Use your eyedropper tool to select one of the colors, and fill the bottom layer of your working image with it. Use this color for your transparent color.
A couple of things to be careful of, first off,make sure you don't over-write your background tile, simply close it and select "Don't Save"! This technique works best with sharp-edged shadows, with a blur of 2 pixels or less, (this example is done at 8 pixels to exagerate the point.) Either way you go, this method is the first step to for all the other ones, it's from this file that we get our transparency mask. |
|
|
I've been a registered user of PhotoGIF© since it first came out, and sometimes forget that other folks don't have it. The GIF89a export module from Adobe (Mac or Win) is great for *saving* transparent GIFs, but PhotoGIF gives me a capability that the other doesn't. This is it's ability to create an new alpha mask of the transparency, which it places in the image as Channel #2. Hmm, now that we can see the transparency, we can start to modify it. Coolness! I'm sure there's other ways to get this mask out of an image, but PhotoGIF is elegantly simple. It's sharware, costs $45 to register, and I recommend it highly. Unfortunately, it's only available for the Macintosh, so PC & Unix users will have to discover another way to get this mask. I'm sure it's possible, I just haven't bothered to figure out how yet. I'll leave this as an exercise to the student. ;-) The following methods assume you have this mask, by PhotoGIF or otherwise. |

|
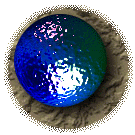
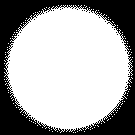
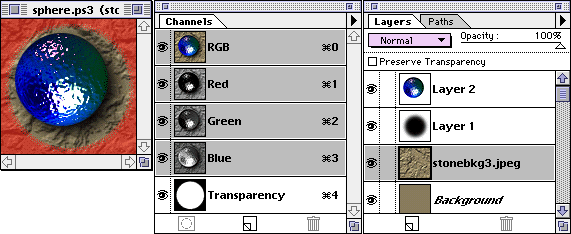
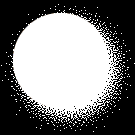
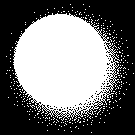
Method 2. Here what I've done is take the original B&W mask from the first image, and paste it into my original Photoshop working image as a new channel. I throw away all the other channels, and I'll use this as my 'alpha mask' for transparency.
Now open the background you're going to use on the web page, "select all", and choose "edit/define pattern". Close the image, and choose the create a new layer at the bottom of your working file. Choose "edit/fill", selecting "pattern", 100%, and "normal". Now your shadow falls over the background, and when you save the file, specifying "use alpha mask" for the transparency, it will clip the file along that mask. Remember to save this file with a new name, don't over-write your working file!
This method doesn't work with every background, if your background has some radically different colors in it this method may not work for you. Here's a screen capture, just before I dropped down to "indexed color" and saved as GIF89a with PhotoGIF. |
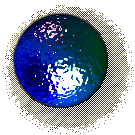

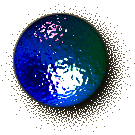
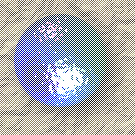
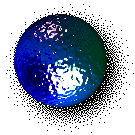
| The "dither" method. Here's what we've done is fill the alpha mask in the shadowed area with an 'on-off' dither. It's a simple, 2 color image, that looks like this...
Download this image, "dither.gif", you'll need it for this technique. |
 |
 |
As before, we copy the original alpha mask into our working image as a new channel. Open the image "dither.gif", select "all", and choose "edit/define pattern". Go to the transparency channel, and choose "edit/fill", but with some slightly different settings. Choose "pattern", 100%, and *Multiply*. This will fill the white part of the mask with the dither. We could stop here, and this would give us the 'ghost' image at the top right. I'd prefer the sphere to remain solid, so here's what you do. Go to the layer that has the sphere on it, select "all", and use the arrow keys to push it one pixel right, and one pixel left. This selects just the sphere, with nothing moved. Go to the menu, and choose "select/modify/enlarge", and choose 1 pixel. Go back to the mask channel, and fill this area with white. That's our mask as above. Reduce to indexed color, and save as GIF89a specifying "alpha mask" for the transparency. Neat, huh?
|
|


Entire contents copyright ©1994-98 by Doctor Thaddeus Ozone, all rights reserved.
|